Enabling UserDir on only one Apache VirtualHost

Let’s say you have a web server running apache and you have a bunch of virtual hosts for a bunch of domains. You want to enable UserDir so that example.com/~user URLs automatically map to (by default) the public_html directory in each user’s home directory. Apache already includes a userdir module, so you go and enable it. But, oops, by default it enables it on all your hosts, not just one. You want it enabled on just one, not all of them. So you go and google and there are a bunch of complicated solutions to this that seem way too much like overkill. Fortunately there is a much simpler solution:

First, go to your apache configuration directory, for example on Debian:

cd /etc/apache2

Second, enable the userdir module:

sudo a2enmod userdir

Third, delete the enabled userdir configuration file:

sudo rm mods-enabled/userdir.conf

Fourth, edit the virtual host configuration file, e.g. sites-enabled/example.com.conf, that you want to use userdir on and add this line within the VirtualHost scope:

Include mods-available/userdir.conf

Fifth, reload apache, usually by running (if you use systemd):

sudo systemctl reload apache2

Really simple, right? An explanation of this is in order: Why did we enable it only to delete the configuration? Enabling a module actually does two things: First it adds a .conf file that tells apache the default configuration of the module. Second it adds a .load file that tells apache to load a dynamic library with the executable code that apache runs when the module is used.

By default, the .conf file applies globally, i.e. to all of the sites in use. This is great if you want all of your sites to do the same thing. It’s not so great if you want the module enabled only on one or a few sites. The effect of the above is to load the dynamic library so that apache can use it, but not to add the global configuration. The “Include” in the virtual host configuration file will enable the configuration for the module for that virtual host only.

If you need to further tweak things (enable or disable specific usernames, the path, etc.) then instead of using “Include” you can copy the contents of mods-available/userdir.conf into your virtual host configuration file and customize as needed.

In principle, the same procedure should work for other modules you want to use only on specific virtual hosts.

How to sideload VLC on Fire TV

Many of you may be familiar with the VLC video player from its Windows version, but they also have a version for Android which also works on Fire TV devices. VLC is a great addition to Fire TV for moderate to advanced users, as it allows you to stream videos from internal storage, from Windows Shares over your local network, or from standard video streaming services. I use it mostly to access videos from Windows/Samba shares on my local network. Unlike other solutions like Plex which require additional software to be installed and index your content, VLC can play a video straight over the network share. Just share a folder to the network, and you can play anything in there without any complications.

Why sideload though? Amazon Appstore has the VLC for Fire app already there. You can just click to install and you’re ready to go. Unfortunately the version in the appstore is old, flaky, and rarely updated. At this writing, the Amazon Appstore has version 2.1.11 of VLC, while the latest available is 3.0.5. With the version from the appstore, I was having frequent problems with hangs, crashes, buffering during playback, and problems playing some files. After sideloading the latest version, all of these problems disappeared.

Sideloading is a bit complex, but it’s not too hard. Even if you’ve never sideloaded before, you can go through this step by step and be running the latest VLC in no time.

There are a couple of things to prepare your Fire TV to sideload VLC:

First, you need to turn on the ability to install sideloaded apps. This may sound a bit scary, but all this does is let you install things that didn’t come directly from Amazon. As long as you are careful to install only apps from reputable sources, you should be fine. On your Fire TV, go to Settings at the top right of the home screen, then click on “Device”, then “Developer options”, then look if it says ON or OFF under “Apps from Unknown Sources”. If it says “ON”, you’re already set. If not, press it and then select “Turn On”.

Second, you’ll need to uninstall VLC if it you’ve already installed it from the appstore. If you don’t do this, it will try to upgrade it during sideloading but fail because the application source was different, so you have to uninstall what you have first. Go to “Settings”, then “Applications”, then “Manage Installed Applications”. Scroll down to VLC and if it is there, click on it, then click on “Uninstall”. When it is done, repeat these steps again to confirm that VLC is no longer listed.

Next you have to get the APK which is the application package installer loaded on your Fire TV. If you’ve ever done sideloading on a phone or tablet you probably just hooked it up via USB to your computer and dragged and dropped the file to the device’s storage. You can’t really do things that easily with Fire TV. Fortunately there’s an app for that. Go to the home screen on your Fire TV device. If you have an Alexa enabled Fire TV device, just hold down the microphone button and say “Downloader” or, go to the main screen’s search feature in the upper left and type in “Downloader”. You should see a big orange button called “Downloader”. Click on that and install it.

Now that “Downloader” is installed, go to the home screen and click on and run “Downloader”. If it isn’t on the apps list on the main screen you may need to search for it in your apps list. It will then prompt you to enter the source you want to download and install from. For VLC, you want to enter “get.videolan.org” and then press the “Go” button. This is the official VLC website. Be careful not to get it from any other source. Next scroll down and click on “vlc-android”. On the next screen select the version you want to install. You’ll usually want the latest version.

On the next screen you’ll see a list of APKs for various platforms. Which one should you choose for Fire TV? If you have a 4K Fire TV device, then you probably want the ARMv8.apk package. If you have a 1080p Fire TV device, you want ARMv7.apk. Click on the appropriate version and a few seconds later the download should start. It may take a few seconds or minutes to download depending on your network speed. Once it does it should prompt you to install. Scroll down and click “Install” and a few seconds later it will say “App installed” if it was successful.

If for some reason it says “App not installed” then something went wrong. If you were trying to install the ARMv8.apk package, go back and try the ARMv7.apk package instead. Otherwise go back to the start of this guide and make sure that unknown sources is turned on, and any existing VLC package is uninstalled.

Once it installs successfully you can go back to the home screen and look for it in your list of apps or search your apps for VLC and run it. Then scroll down to the “Other” menu and make sure “About” shows the correct version number. That wasn’t so hard, was it?

One thing to keep in mind is that since you manually installed VLC, it will not be automatically updated by the appstore. You should periodically upgrade to the latest available version if you want to keep up to date. If you upgrade using the same source then you can install it without needing to uninstall the current version.

Upmost M.2 to PCI-e Adapter Card

(tldr: This inexpensive board is compatible with M.2 PCIe X4 SSDs.)

I was finally getting around to moving the hard disks to my new desktop system when I discovered a few drawbacks to the new system’s motherboard. I had bought a motherboard which supports two M.2 PCIe X4 slots. M.2 is the followon to the old mSATA standard for SSD storage in tiny slots. While it was originally intended for laptops and compact “brick” computing devices, it’s now becoming standard on desktop motherboards as well.

The reason is that the SATA standard has peaked out on performance. SATA-3 performance tops out at 600MB/s and SSDs have already run into that limit for a couple of years now which is why you may notice that pretty much every current SATA SSD drive now has a rated read performance of 550MB/s. After overhead, that’s pretty much the best SATA can do.

SATA’s answer to this is a clunky solution called SATA Express that takes two SATA connectors plus an additional connector to run PCIe X2 to a drive. Implementation wise, this halves the number of drives supported by a motherboard, and requires a huge clunky cable to the drive. Motherboards are out which support SATA Express (including mine), but actual drives which support it are essentially non-existent.

Unlike mSATA which supports just SATA and has a restricted slot size, M.2 was designed to be much more flexible. It can do SATA, it can do USB, it can do PCIe at X2 or X4 speed, and more. It also supports multiple slot sizes. Basically they wanted it to be a jack-of-all-trades slot instead of a one-trick-pony. And since it support X4, it can go twice as fast as SATA Express.

For SSDs the first generation of M.2 drives was all SATA, with the same performance limitations, but at least the drives took up a fraction of the space of the traditional 2.5″ SSD drive. This year saw the introduction of several models of M.2 PCIe X4 drives. The big advantage here is performance, with the PCie 3.0 X4 standard supporting speeds of over 3900MB/s, or about 7 times faster than SATA. The actual drives quickly leapfrogged SATA performance with the early drives offering performance of 1400MB/s or higher. Samsung has a drive coming soon with a top speed of 3500MB/s, almost reaching the limits of the interface. (Don’t worry, PCIe 4.0 is coming next year with even higher speeds.)

So after all that introduction, I built my new desktop back in June based on a 240GB Kingston HyperX Predator SSD which at the time was the fastest SSD readily available on the market in Taiwan. It cost over twice as much as a regular SATA SSD, but performance was 1400MB/s, well over twice as fast. Several months later, the Intel 600P SSDs came out, offering a bit better performance but a much more reasonable price premium of around 20% more than an M.2 SATA SSD, so I added on the 512GB model offering performance of 1775MB/S.

Some time after this, I attempted to start migrating my HDDs over from the old desktop which is when I ran into problems. I moved over a couple of HDDs, got everything hooked up, powered up, and… nothing. Drives didn’t show up in the BIOS or in Windows. I tried different cables, tried twiddling BIOS settings, and got nothing until I tried different SATA ports on the motherboard and by process of elimination found that SATA ports 0-3 didn’t work, but ports 4 and 5 did.

What the heck was going on? Was my motherboard broken? But why did two ports work instead of all six being defective? Finally I dove into the motherboard manual and discovered the reason. Chipsets only support a limited number of PCIe lanes, and each M.2 X4 slot uses up 4 of these, so I was using 8 lanes for my M.2 slots. As a tradeoff, the first M.2 slot shares lanes with the traditional PCIe X4 slot, while the second M.2 slot shares lanes with the controller for the first SATA controller serving the first four SATA ports. Only one of each pair of devices could be used at the same time, and the M.2 slot had priority.

Well, that kinda sucks. Either I only get 2 HDDs in the new desktop, or I have to give up on one of my SSDs (which I had just recently bought), neither a good option. I have 4 HDDs in my old system that I was planning to migrate and wanted room for growth. (The case and power supply both support six.)

At first I was thinking of adding on a SATA controller, but the cheap ones had limited performance and typically only supported two drives, while the ones with good specs were pretty expensive. That didn’t seem like a good option.

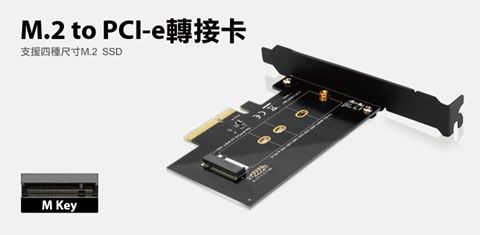
Then I found a few PCIe add-in boards that allow putting an M.2 PCIe drive in a PCIe slot. You need to be careful here because most M.2 PCIe add-in cards support controller-less M.2 SATA only, not M.2 PCIe X4. Eventually I found this board from Upmost which looked like it fit the bill, and it was only TW$399/US$12.50. It looked like it would work, but I wasn’t quite sure.

But wait, this uses one X4 slot but my motherboard only has one X4 slot, and it is disabled when the first M.2 slot is in use. No problem! It also has one X8 and one X16 slot, and these can also reportedly support X4 cards. Or at least I thought so.

Well, I bought the board, took my Intel 600P SSD out of the motherboard M.2 slot and moved it to the Upmost board and slipped it into the X8 slot. Booted up… and it worked! Drive showed up in Windows, benchmarks the same, and all my SATA ports worked too.

Now time to start moving those HDDs over.

http://www.upmostgroup.com/tw/product/info/86/1976

VPS Migration

Tonight I migrated my VPS from vpslink which I no longer recommend to GeekStorage. They both run Debian on OpenVZ/Virtuozzo, so I figured it wouldn’t be hard to migrate over.

I didn’t really find much about migration on the user side. Most of the migration pages were about how to migrate containers from the host server’s perspective. I did manage to cobble together enough clues to figure out what to do.

Basically to summarize the essential points, you can just copy everything from the old server to the new, clobbering whatever is there, EXCEPT for the following:

/aquota.group
/aquota.user
/etc/fstab
/etc/hostname
/etc/hosts
/etc/resolv.conf
/etc/network/interfaces
/etc/network/interfaces.template
/dev
/proc
/sys

In more detail:

On vpslink I have Debian on OpenVZ. So when I signed up the GeekStorage, I requested Debian on Virtuozzo. OpenVZ is the open-source variety of Virtuozzo, so they are close enough.

When GeekStorage said the VPS was ready, I logged in and used rsync to copy everything from the old server to /backup/old. That took a few hours. Then on the old server, I shutdown all the services (sendmail, apache, mysql, tinymuck, etc.) and then ran rsync again. That updated everything that changed while the first rsync was running, and was fairly quick.

Once that was done, I put the server in repair mode. This creates a temporary container with the real container’s contents mounted under /repair. I logged into the repair mode serve. First I moved everything in /repair except aquota.*, backup, dev, proc and sys to /repair/backup/orig. This moves the new VPS’ original OS files out of the way.

Then I moved everything in /repair/backup/old except aquota.*, dev, proc and sys to /repair. That moves the old VPS’ OS files to the new VPS’ root directory. Then I copied the etc files (see above) from /repair/backup/orig/etc to /repair/etc.

Caveats: Remember that there are probably hidden dotfiles in the old and new root dirs you need to move too. Also remember to always work in /repair when in repair mode. It’s easy to forget and start twiddling in /etc instead of /repair/etc. That disappears as soon as repair mode is finished.

Then I took the server out of repair mode, which boots into the VPS container again. And miraculously, it booted up just fine with everything looking just like it was on the old VPS. I had to twiddle a couple of other files with hardcoded IPs, but the OS came up just fine. I also had to update a bunch of things in DNS and wait for DNS caching to time out.

Windows Update Fail

For several days now my desktop system has been trying and failing to install a windows update for “Microsoft UAA Bus Driver for High Definition Audio” over and over again. The update was from 2004 so it is unclear why this was suddenly something it is trying to install now. I finally got whatever it was resolved:

– In Device Manager (Control Panel, System, Hardware, Device Manager) expand the “System devices” category

– For each “Microsoft UAA Bus Driver for High Definition Audio” device, right click and select “uninstall”

– It will ask you to reboot; do so.

– When it reboots it will reinstall the device and ask you to reboot again; do so.

– Now you should no longer see the update trying to install.

(It may try and fail to install the update again during the two reboots but just ignore that. It should be back to normal after the final reboot.)

Using Eset NOD32 Antivirus on English OS in Taiwan

One of the problems for users of English version OS in Taiwan is it is often difficult to get English versions of software as most items on the shelf are the Chinese version. A critical requirement on any computer is antivirus software.

I had previously used AVG (Commercial Version) on my main Desktop and Laptop systems, but it has been getting a bit bloaty and intrusive lately. (I still use and recommend the free version on less critical PCs.) Several months back I started looking at other AV solutions and two that came highly recommend were Kaspersky and Eset NOD32.

I had received a 90 day trial of Kaspersky with a hard drive I bought, so I gave that the first chance. Unfortunately while Kaspersky was fairly efficient, it was much more intrusive than AVG. When installing software it would almost always warn of the impending doom that could be caused by SETUP.EXE and verified that I was willing to risk death and destruction by running it.

It also frequently popped up confirmation dialogs when running programs for the first time, and generally was fairly generous about notifying me about all kinds of non-serious things. I don’t want my AV software to do that. I just want it to sit there quietly and quickly checking things and only telling me when it finds a real problem. So, Kaspersky was ruled out.

Then I downloaded a free 30 day trial of Eset NOD32 and for the whole trial period it did exactly what I wanted, quietly sitting in the background and only popping up when a real problem was found. (The first time this happened was late in the trial period when I started backing up my Gmail.) I managed to make it through the trial period without it annoying me with stupid stuff.

So now the problem… Only the Chinese version is sold in Taiwan. I did some searching and it seemed that it would be possible to switch to the English version, but nothing conclusive. Eventually I had to decide, so I rolled the dice and bought a copy. If you need to do the same thing, here is what you need to do:

  1. Buy a copy of the software. I bought it from PC-Home’s 24h Shopping. I bought the 3 Year License Home Version. (Click on NOD32 on the left if you want a different license.)
  2. When you get it, look at the back of the manual to find your license code. You will need to activate on the Eset’s Asia servers, not their US servers. If you can manage basic Chinese then you can register on Eset Taiwan or if you need English, go to Eset Singapore.
  3. After you register, click on the Download link and then select “Download Purchased Software / Home Users” and scroll to the bottom for the English 4.0 version. The “Download” link will download the software and the “Manual” link will download the manual. (That’s for the Singapore site. The Taiwan site is organized a bit different. Click on download then select the English download link.) You will need your username and password to download, which is emailed to you about 15 minutes after registering.
  4. Install the software.

Only one extra caveat. When I used the “Verify License Validity” option just after installing, it didn’t work. However, it was working fine by the next day. I’m not sure if it was something broken yesterday or if there is a delay during registration.

Illustrated “David and the Phoenix” by Edward Ormondroyd for Kindle

I’ve been pretty happy about the quality of eBook purchases so far. There’ve been a few rough edges but nothing major.

That changed when I bought a Kindle version of “David and the Phoenix” by Edward Ormondroyd a few weeks ago. This is a classic children’s storybook which is no longer in copyright. It is also beautifully illustrated by Joan Raysor.

Unfortunately the version I bought did not have any of the illustrations. Instead, everywhere there was supposed to be a picture there was instead just the text “[ILLUSTRATION].” To their credit, when I complained to Amazon about the problem they immediately refunded the purchase.

That still left me with a problem. I still wanted an illustrated ebook copy. I set out on my quest and unfortunately all the Kindle-compatible versions I found were either without illustrations or were very poorly formatted.

I came across a free version with illustrations in HTML and was able to reformat the text, table of contents and images such that it would display nicely on the Kindle. After much toil I got a beautifully displayed Kindle version with all the original illustrations.

Since the source I used was freely redistributable, I opened up a publishing account with Amazon and published my version with them, which you can now get here:

David and the Phoenix (Kindle Edition)

Setting Kindle Date and Time Without Wireless Networking

One drawback of using your Kindle 2 in an area without wireless connectivity is that the date on your Kindle will not be set correctly, but instead be set to sometime in 1970. (UNIX timestamps start from January 1, 1970 and Kindle’s software runs on Linux.) This is really not a very serious problem except that your bookmarks, notes and clippings files will have bogus timestamps.

Fortunately there is a hidden option to enable networking over USB connections. If this connection is enabled and properly set up, then one of the things it will do when connected is set the time. The time on mine was set to UTC (sometimes called GMT) time zone instead of Taipei time (UTC+0800), but at least it is only 8 hours off instead of 39+ years.

I learned how to set up USB networking on Kindle from Jesse Vincent’s blog post Tethering your Kindle 2 where he explains how to do this on MacOS. Since Windows systems are a bit different below is a shorthand version for Windows XP. If you get confused by anything, see Jesse’s original post for more detail. Vista procedure is probably a bit different.

  1. Get the driver here: http://www.davehylands.com/linux/gumstix/usbnet/linux.inf (If you run XP x64 or Vista 64-bit, you will need to modify the driver as documented here: http://docwiki.gumstix.org/index.php/Windows_XP_usbnet#Step_7.)
  2. Enable Internet Sharing on your Windows box. Open the “Network Connections” Control Panel, right click on your main network connection and select “Properties.” Select the “Advanced” tab and enable “Allow other network users to connect …”
  3. On your Kindle press “HOME”.
  4. Search: ;debugOn
  5. (Optional) Search “`help” to verify debug mode is on; you should get a list of available commands.
  6. Search: `usbNetwork
  7. Search: `usbQa
  8. Connect your Kindle to your computer’s USB port. You should see a network connection detected. When it asks to install a driver tell it to manually install, and point it to the directory you saved linux.inf to.
  9. The “Network Connections” Control Panel will now have a new network connection listed. Right click on it, select “Properties,” click on “Internet Protocol (TCP/IP)” at the bottom of the scroll box and press “Properties.” Enter the following: “IP address: 192.168.15.200” “Subnet mask: 255.255.255.0.”
  10. Shortly after connecting to the Internet you Kindle should update the time setting. You can confirm if it does so by searching: @time
  11. To get your Kindle back to normal USB mode, restart it: “HOME” “MENU” “Settings” “MENU” “Restart”

Using Kindle 2 Internationally

(NOTE: I believe most if not all of this applies to Kindle 1 as well but my experience is with Kindle 2. Whenever I use ‘Kindle’ below I am describing my experience with the Kindle 2.)

The biggest question I had to answer when deciding to buy a Kindle 2 was whether I could use it in Taiwan, and if so how and what limitations would I face? The information I found via Amazon and other sites was a bit muddled. Yes, I could use it outside the US, but the details weren’t quite clear.

First the basic requirements:

  • You have to ship the Kindle to a US address and have it reshipped to you
  • You have to use a US issued credit card with a US billing address to purchase content
  • You have to download content on the “Manage My Kindle” page and copy it to the Kindle via USB

You will have to meet ALL these requirements to be able to use Kindle outside the US. If you meet those requirements and aren’t interested in the details, you can stop reading here. Otherwise, read on…

Let’s take these one at a time:

Amazon currently only ships the Kindle 2 to US addresses, so you cannot have it sent directly to your international address. Here are some alternatives: Send the Kindle to a friend or relative and have them reship it to you or carry it with them next time they visit. Send the Kindle to a forwarding company and have them reship it to you (I use US Global Mail). Send it to your hotel or residence next time you are in the US.

To buy and download content you will need to have a credit card issued by a US bank with a US billing address. There are reports that you can get around this by using gift cards or gift certificates but I haven’t verified it. If you are an American moving overseas you can keep your credit accounts active by changing the billing address to a friend or relative’s address or use a forwarding company as mentioned above. If you also keep an open bank account you can pay the credit card bills easily over the Internet.

The wireless service for Kindle is currently only available in the US, so you won’t be able to take advantage of buying books on your Kindle and start reading right away. Instead, you will have to log on to Amazon’s web site and buy books from the Kindle Store. The purchasing process will automatically send the purchase wirelessly but we can just ignore than and proceed to the “Manage Your Kindle” page. Down at the bottom your purchases will be shown. In the last column there is a pull down menu. Just select “Computer” and the file will download and you can copy it to the Kindle over USB. It’s not quite as convenient but not a big hassle either.

Now for more details:

No special download program, sync program, document management program or driver is needed to get books from Amazon onto your Kindle. You don’t need to use a proxy to make it look like you are in the US. The files download as regular files in your web browser. When connected to a computer, the Kindle appears as a generic USB storage device, which should automatically work with any modern OS: Windows, MacOS, Linux, etc. Just find the “documents” folder on the Kindle and copy the files you downloaded there and the book will be ready to read as soon as your disconnect from the computer.

Downloaded books are tied to the serial number of your Kindle. If you get a new Kindle for any reason you will have to download new copies of all your books for the new Kindle. You can also have up to 6 Kindles registered at a time to a single account and share books between them, but you will have to download separate copies of books for each Kindle you want to use them on. Amazon keeps copies of all your books for you to download again indefinitely.

For newspapers and magazines the situation is a bit different. This content can only be downloaded to a single Kindle at a time. Amazon only keeps online for re-download the most recent 7 issues of any periodical. The Kindle also automatically deletes issues older than the most recent 7 unless you flag an issue to keep. You will have to do that for each individual issue. If you get a new Kindle for whatever reason you can change your subscriptions over to the new one but you will only be able to download the latest 7 issues. This is probably not a big deal for newspapers, but I was considering subscribing to the Kindle versions of the sci-fi magazines “Analog” and “Asimov’s” if not for this restriction, as it is sometimes nice to be able to go back and re-read these stories. I hope that the publishers will revisit this restriction. (UPDATE: You can get a more flexible subscription for these two magazines through Fictionwise. Cheaper too!)

One thing I was worried about was if there would be any problems with the copy protection scheme if I didn’t register the Kindle over wireless. It turns out not to be a problem. Normally if you buy a Kindle it will be registered to your account and the first time it connects to the wireless system it will automatically become registered. So there are two pieces here: 1) Your Amazon account has a registered Kindle and 2) Your Kindle is configured to use your Amazon account. It turns out that if you never use the wireless service, the second part doesn’t matter.

Once your Amazon account knows about your Kindle, downloads are tied to the Kindle’s serial number and will work even if the Kindle has not registered itself to your account. Your Kindle will show as not being registered and will not show your name in the upper left corner, and you won’t be able to use any wireless services (duh!), but everything else mentioned here will work fine. If your Kindle was purchased by someone else you can register it on Amazon by entering the serial number on the “Manage Your Kindle” page. (The purchaser will need to de-register it first on their “Manage Your Kindle” page unless it was purchased as a gift.)

Alternatively if you have a friend or relative in the US receive it they can turn it on to get it registered wirelessly before reshipping it to you, but the only practical result of this is you’ll have your name in the upper left corner.

Now it may be obvious to state, but none of the wireless services will work outside of the US. Because it won’t work, the first thing you should do is TURN OFF THE WIRELESS as soon as you get your Kindle. Press “Menu” then use the “5-way” joystick thingy to select the option to turn off wireless, then press in the “5-way” button. You should then see the word “OFF” next to the battery indicator in the upper right corner instead of the signal strength bars. If you don’t turn it off you cut your battery life by more than half for no reason.

You will also need to do things differently if you use the document conversion system. The normal way of doing things is you would mail a document to your Kindle address (it will be listed on the “Manage Your Kindle” page) and the document would be wirelessly delivered to the Kindle and 10 cents charged. You will need to instead use the free conversion service. If your Kindle address is john.smith@kindle.com, instead mail your documents to john.smith@free.kindle.com. Amazon will mail the converted documents to the email address you use as your Amazon login. You then download the file in your mail program and copy it to the Kindle via USB.

There is one thing for which there appears to be no workaround currently, and that is the ability to update your firmware. Currently that appears to only be possible wirelessly. UPDATE: At this writing Amazon does not publicize the download location and manual upgrade directions for Kindle 2 like they do for Kindle 1. Fortunately my old buddy Bruce has posted the details here.

If you have your Kindle reshipped, it can get expensive. Just as an example of the “full cost” I paid:

Kindle $359.00
UPS US 2-Day $11.98
Fedex Intl Priority $55.94
Insurance $3.00
Customs Duty $18.43 (TW$645)
Total $448.35

The cost could have been reduced if I had chosen free shipping for the US leg and slower international shipping. You can avoid the international shipping and customs fees if you pick it up during a US trip or ask a friend to carry it for you when they come to visit. The shipping and duties will vary by country, but this should give you an idea what you may have to pay to have it shipped to your international address.

UPDATE: I left out an important factor for many international users which is power compatibility. Taiwan and US both use the same voltage and outlets (though grounded outlets are rare in Taiwan), so I didn’t really think about this issue. The good news is that the Kindle power adapter supports 100-240 volts, so you just need a cheap and common plug converter and not a transformer. Even more conveniently is that the power cable is also a standard USB cable so you could recharge via any standard computer USB port, or you could buy a standard AC-to-USB adapter using the local plug type. It is nice to see so many devices move to USB charging as it sure simplifies these matters. Now if they could all decide on one connector type on the device side… Kindle 2 has Micro-USB, but my HTC Touch Pro uses Mini-USB, and iPod Nano uses the Dock connector. I’m down to only needing one power adapter now but still need 3 different cables! (UPDATE: Make that two power adaptors. My Nano won’t work with my Kindle charger and my Kindle won’t work with my Nano charger. Standards!)
Upgrading Laptop to SSD (Flash Disk)

The hard drive in my laptop has been a bit flaky lately so I decided to replace it. The original drive is a 4200rpm Toshiba MK802GAS 2.5″ 80GB IDE drive. It was also running a bit hot and the laptop doesn’t really ventilate the drive much, so I was reluctant to replace it with a faster 5400rpm or 7200rpm drive that might run even hotter.

Fortunately there are now replacement drives based on flash memory rather than spinning disks. When they first appeared they were expensive and slow, but they are improving in both respects. Performance is now equaling or exceeding the fastest traditional disks. Cost per gigabyte is still much lower with traditional disks, but prices have come down enough that it is possible to get a usable sized disk for a reasonable price.

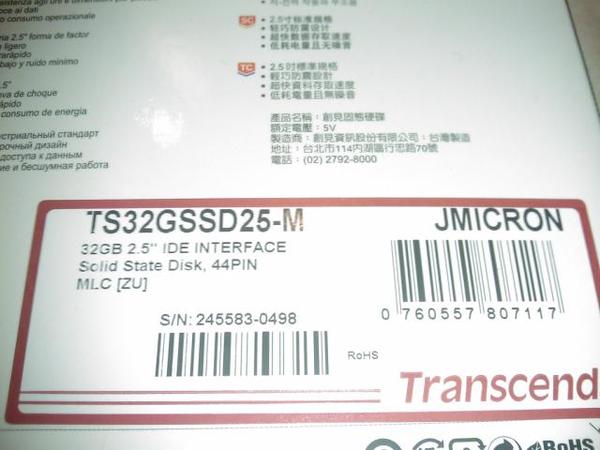
Since my laptop is IDE, my choices were limited. In Taiwan only Transcend has IDE SSDs on the market. (There are many more choices for SATA.) The two choices then were whether to get MLC or SLC technology and what size. In general MLC write performance lags SLC write performance significantly, but SLC is much more expensive. I eventually settled on the 32GB MLC model: Transcend TS32GSSD25-M. I bought it for TW$3488 (US$100.03) including shipping on PC Home.

When I was researching what to buy I noticed a very peculiar thing. There seemed to be two different drives with the same part number! Older benchmarks on this model showed read speed of barely over 20MB/s while newer benchmarks showed read speed over 65MB/s. It turns out that Transcend updated the hardware sometime in late 2008 and didn’t bother to change the part number. They will probably lose a lot of sales because of this because anyone who researches the performance will probably see the terrible old benchmarks and bad reviews.

Here’s what you should see on the box with the new version. The important part is apparently the “JMICRON” part in the upper right of the label which indicates that it uses the newer controller hardware:

UPDATE: It appears that not all new models have “JMICRON” on the label on the back. One way to tell the difference is that the label on the new models has a red border while the label on the old models has a blue border.

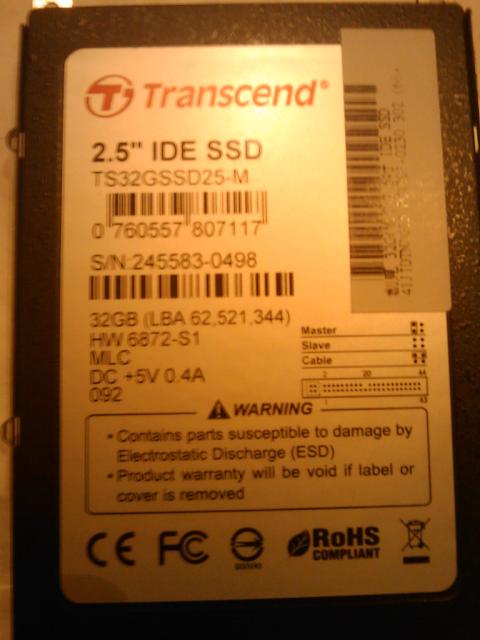
Here’s the label on the drive itself:

The important parts here are the Hardware Level of 6872-S1 and the manufacture date “092” which indicates it was made in the 2nd week of 2009. If you have this or better you should have the newer, faster version.

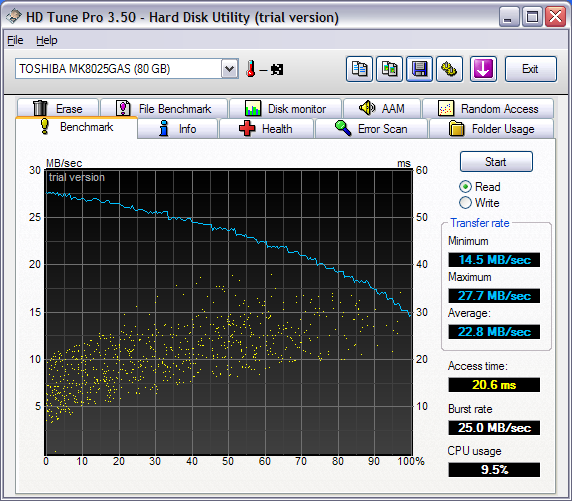
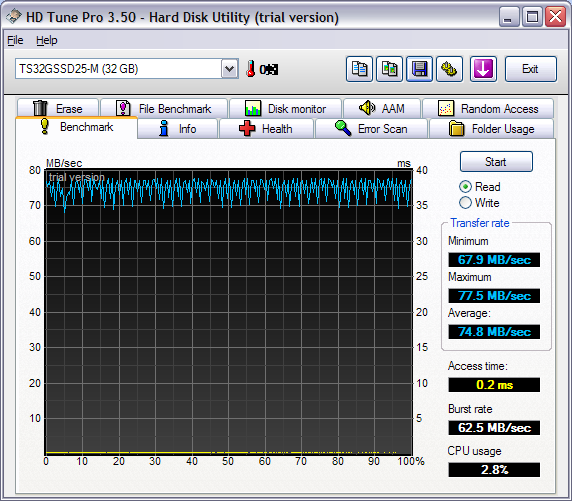
Let’s see how it measures up when compared to the old drive. First we’ll run a read benchmark across the disks with Medium speed/accuracy and 2MB block size:

Old:

New:

The new drive blows the doors off the old drive at 3.3 times faster the average speed. Comparing the minimum speeds and random access, the new drive shines even brighter. Two advantages SSD drives have are uniform performance across the disk, and no “seek” time. Seek time is how long it takes a traditional disk to reposition the read/write head to a different part of the disk. This tends to have a much bigger impact on realistic performance because a typical workload does not tend to do long sustained reads or writes but instead accesses lots of small files and programs scattered across a disk.

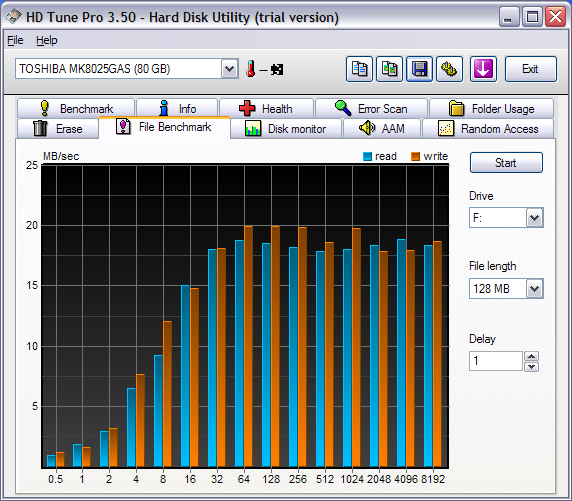
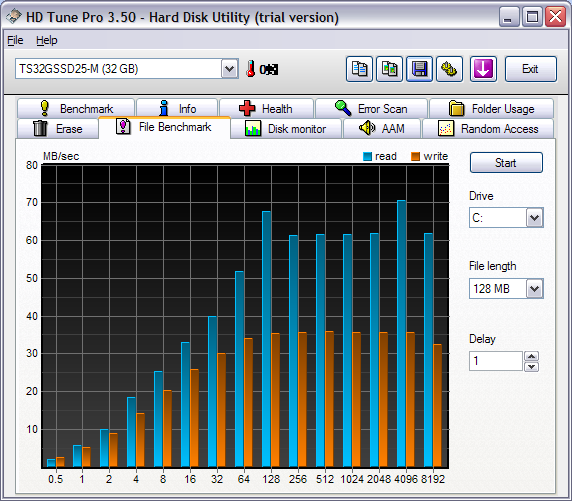
Next let us do a file benchmark. This uses both read and write at various blocksizes. I’m using a 128MB file and 1 second delay:

Old:

New:

This is where we see the drawbacks of MLC technology; the write speeds lag read speeds significantly. On an SLC drive the read and write speeds would be more comparable. Even so, the write speed on the new drive is still about 10MB/s faster than the old.

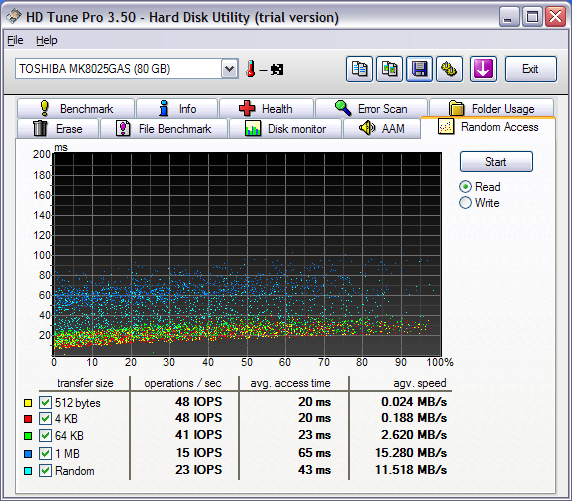
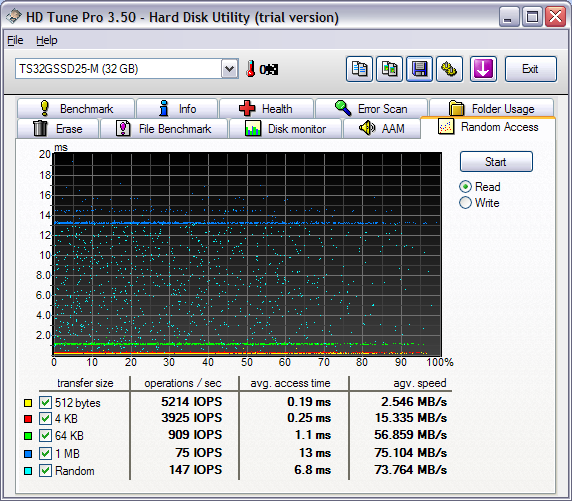
And lastly a random access read test. This tries reading data at various block sizes from random locations on the disk, then computes an average access time and total read speed during the operation.

Old:

New:

Again, this is one area where SSDs really excel. There’s no seek time, so the access limit here is the read time, and performance greatly surpasses that of the old disk.

But more important is how does it feel? Windows boots up extremely fast and doesn’t have the “sluggish” feeling for the first couple of minutes like with a traditional disk. This is probably mostly due to the lack of seek time, but I’m sure that the read speed increase and the fact that it is a fresh install of Windows also helps. I also upgraded my RAM from 1GB to 2GB at the same time, so that probably also is a factor.

And so far I don’t feel confined by the smaller sized drive. Most people should have plenty of room with even 16GB drives as long as they keep away from video files and keep the music files to a minimum. I was using a bit more than 32GB before, but that includes a lot of junk that I don’t really need to carry around. I’ve got all my essentials now and still have plenty of space left.